The Ultimate Guide to Ice Cream Cones: History, Making, and Types
Nothing says summer like a cool scoop of ice cream served in a crispy, crunchy cone. Whether you’re indulging in a classic waffle cone or experimenting with a sugar cone, ice cream cones have become an iconic part of the ice cream experience. In this comprehensive guide, we’ll dive deep into everything you need to know about ice cream cones: from their history to how to make your own at home. Let’s explore the wonderful world of ice cream cones!
History of Ice Cream Cones
Ice cream cones have a fascinating history, intertwining various cultures, innovative individuals, and happy accidents. The origin of the cone as we know it today can be traced back to the late 19th century. However, the concept of a cone-shaped pastry used for desserts dates as far back as Ancient Greece and Rome, where wafers were used to hold sweets. The evolution of the ice cream cone was a gradual process, with different cultures contributing to its development.
The modern ice cream cone is often credited to Mrs. A. B. Marshall, an English cook, who is believed to have written the first documented recipe for an ice cream cone in 1888. This invention gained further traction at the 1904 St. Louis World’s Fair, where it is said that Ernest A. Hamwi, a Syrian concessionaire, helped popularize the ice cream cone by using waffle cookies to hold ice cream after a vendor ran out of paper cups. Since then, ice cream cones have become a universal symbol of indulgence, transforming from a novelty to a staple in every ice cream parlor worldwide.
How to Make Waffle Cones
Making homemade waffle cones is surprisingly easy and adds a personal touch to your ice cream experience. To begin, you’ll need a few key ingredients: egg whites, butter, sugar, flour, and vanilla extract. Once you’ve prepared the batter, the secret to making perfect waffle cones is using a waffle cone iron. A waffle cone iron ensures even caramelization and a crisp texture, giving your cones that classic flavor and structure.
The process of making homemade waffle cones is simple. Start by melting butter and whisking together the egg whites, sugars, and vanilla extract. Then, mix in the flour to form a smooth batter. Once the batter is ready, pour it onto the preheated waffle cone iron, cook for about 60 to 90 seconds, and remove the cooked cone. While it’s still warm, roll the cone using a cone-shaped mold or a simple towel to shape it. The result? A crispy, homemade waffle cone that can hold all your favorite ice cream flavors!
What Are Ice Cream Cones Made Of?
Ice cream cones are made from a simple yet delicious batter, combining just a few basic ingredients. These typically include egg whites, butter, sugar, flour, and vanilla extract. The base of the batter is usually a combination of sugar and flour, with the egg whites adding structure and lightness to the cone. The butter helps achieve that perfect crispy texture while the vanilla extract adds flavor that enhances the overall taste of the cone.
In some variations, additional ingredients such as salt or brown sugar may be used to deepen the flavor of the cones. Waffle cones, in particular, use a waffle-style batter, creating the signature grid pattern that makes them both delicious and visually appealing. Sugar cones, another popular type of cone, tend to be a bit sweeter, with a denser texture and a hint of caramelization due to the sugar coating. The result is a cone that perfectly complements the smooth texture of ice cream.
Types of Ice Cream Cones
While the classic waffle cone is a favorite for many, there are several other types of ice cream cones to explore. Each variety brings a unique texture and flavor to your ice cream experience.
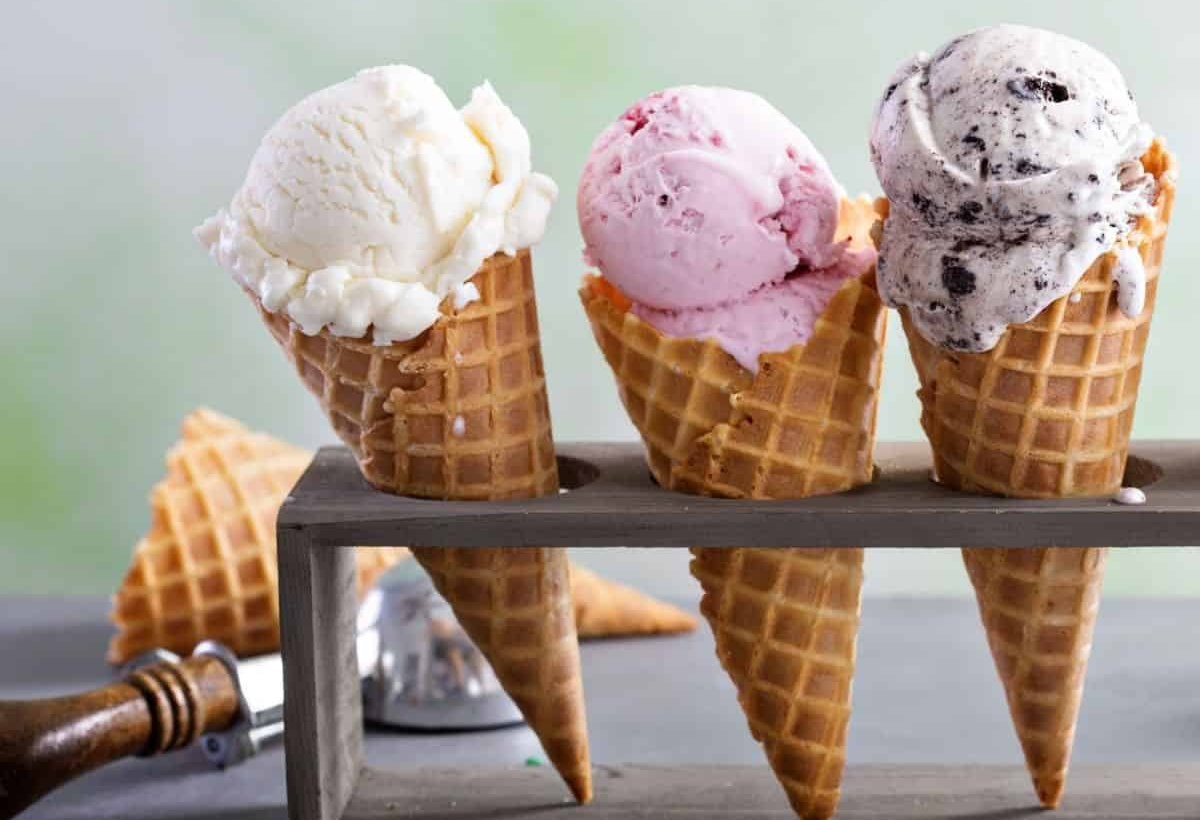
- Waffle Cones: These cones are the most iconic, with their crispy texture and distinctive waffle grid pattern. The deep caramelization achieved through waffle cone making gives them their signature crunch.
- Sugar Cones: Slightly denser than waffle cones, sugar cones are coated with sugar before baking, creating a sweet, caramelized exterior. These cones have a smooth, slightly crunchy texture that holds up well to ice cream.
- Cake Cones: These are lighter and more delicate than their waffle and sugar counterparts. Cake cones are typically used for lighter ice cream servings and are ideal for those who prefer a milder, less crispy cone.
- Pretzel Cones: For a twist on the traditional cone, pretzel cones offer a salty, crunchy alternative to the typical sweet cones. These are perfect for pairing with rich, creamy ice cream.
- Chocolate-Coated Cones: For the ultimate indulgence, chocolate-coated cones add an extra layer of decadence. The inside of the cone is often lined with a chocolate coating, which prevents the ice cream from melting into the cone too quickly.
Each type of cone offers a unique way to enjoy your favorite ice cream flavors, and experimenting with different cones can elevate your ice cream experience to new heights.
How to Store Ice Cream Cones
Proper storage is key to keeping your ice cream cones fresh and crispy. After making your homemade cones, it’s essential to let them cool completely. This ensures that any residual moisture from the baking process doesn’t soften the cone. Once cooled, transfer the cones to an airtight container, such as a zip-top bag or a tightly sealed plastic container.
It’s best to store ice cream cones at room temperature in a dry place. Avoid refrigerating them, as moisture from the fridge can cause the cones to lose their crunch. Homemade cones can last for up to three days when stored correctly. If you’re making cones in advance, they can also be frozen for longer storage, but be sure to let them come back to room temperature before serving them to ensure the best texture.
Ice Cream Cone Recipe
Making your own ice cream cones at home is a fun and rewarding experience. Here’s a simple recipe to make around 6 to 8 waffle cones:
Ingredients:
- 2 tablespoons unsalted butter (melted)
- 3 large egg whites
- 1/4 teaspoon kosher salt
- 1/4 cup + 2 tablespoons granulated sugar
- 1 tablespoon packed light brown sugar
- 1 teaspoon vanilla extract
- 1/2 cup all-purpose flour
Instructions:
- Preheat your waffle cone maker and grease it lightly with cooking spray.
- In a bowl, whisk together the egg whites, salt, and sugars for about a minute until well combined.
- Add the melted butter and vanilla extract, and whisk until smooth.
- Gradually add the flour, whisking until the batter is well-combined.
- Pour about 2 tablespoons of batter onto the waffle cone maker, close, and cook until golden brown (usually 60-90 seconds).
- Once done, remove the cone and quickly roll it into a cone shape while it’s still warm. Hold the cone shape for a minute, then let it cool completely on a wire rack.
- Serve with your favorite ice cream!
Equipment for Making Ice Cream Cones
To make ice cream cones at home, a waffle cone iron is a must-have tool. This specialized equipment allows you to create the perfect cone texture with even caramelization. Waffle cone irons come with a cone-shaped mold that aids in shaping the cone once it’s cooked. While regular waffle irons may look similar, they are too deep and won’t create the correct cone shape.
Additionally, you’ll need a cone-shaped mold for rolling the cones after they’ve been cooked, and cooking spray or melted butter to grease the waffle cone iron. If you’re serious about making cones regularly, investing in a high-quality waffle cone maker like the CucinaPro Waffle Cone Maker can make the process easier and more efficient. This piece of equipment ensures your cones are perfectly crisp and evenly browned every time.
The Ice Cream Cone Invention Timeline
The history of the ice cream cone is rich with innovation and collaboration. As mentioned, early references to edible cones can be found as far back as Ancient Greece, where cones were used for serving sweets. The evolution towards the modern cone began in the 19th century, with Charles Elmé Francatelli mentioning cone-shaped wafers in his 1846 book The Modern Cook.
The real breakthrough came at the 1904 St. Louis World’s Fair, where Ernest A. Hamwi is said to have popularized the ice cream cone by offering cones to vendors who had run out of paper cups. Shortly thereafter, Abe Doumar also began selling cones at the Fair, marking the beginning of the mass production of ice cream cones. By the 1920s, cone-making machines were being developed, with Frederick Bruckman creating a machine capable of producing cones at a rapid pace. This led to the widespread availability of ice cream cones, making them a permanent part of ice cream culture.
Popular Ice Cream Cone Brands
While many ice cream parlors make their own cones, several well-known brands have become synonymous with ice cream cones. Nestlé, Ben & Jerry’s, and Unilever are major companies that not only produce ice cream but also create their own unique cones for their products. For those who enjoy their ice cream cones as a packaged treat, these brands offer a wide variety of cone options, from classic waffle cones to innovative chocolate-dipped varieties.
Doumar’s Cones and BBQ in Norfolk, Virginia, holds a special place in ice cream cone history. Founded by Abe Doumar, who is credited with inventing the first mass-produced ice cream cone, Doumar’s Cones still serves delicious ice cream in freshly baked cones at the same location where it all began. It’s a must-visit for anyone interested in the legacy of the ice cream cone.
Waffle Cone Baking Tips
To bake the perfect waffle cone, it’s important to follow a few key tips. First, ensure your waffle cone maker is preheated to the correct temperature before pouring in the batter. This helps the cones cook evenly and achieve that crispy, golden texture. When rolling the cones, do so while they are still warm. This allows you to shape them without breaking or cracking.
Additionally, make sure your batter is smooth and free from lumps before baking. A smooth batter helps create an even texture throughout the cone. If you’re experimenting with different flavors or variations, don’t be afraid to get creative. You can add cinnamon, chocolate chips, or even zest from citrus fruits to customize your cones to suit your taste.
Frequently Asked Questions
Q1: Can I make ice cream cones without a waffle cone maker? A1: While a waffle cone maker is ideal for creating the perfect cone, you can also bake the batter in a regular waffle iron, though you may not get the exact cone shape. You can roll them by hand once they’re done cooking.
Q2: How do I prevent my ice cream cone from becoming soggy? A2: To prevent sogginess, store your cones in an airtight container and avoid moisture exposure. Additionally, chocolate-coated cones or a light layer of wax can help prevent melting ice cream from soaking into the cone.
Q3: What’s the best way to store homemade ice cream cones? A3: Store homemade ice cream cones in an airtight container at room temperature for up to 3 days. Avoid refrigerating them, as this can cause them to lose their crisp texture.
Ice cream cones are more than just a vessel for ice cream; they are a delightful part of the ice cream experience that adds texture, flavor, and fun. Whether you prefer a classic waffle cone, a sweet sugar cone, or a decadent chocolate-coated cone, there’s no denying that these crispy treats bring joy to ice cream lovers everywhere.
Read Next:- Serrano Pepper